How to Shoot Products Using the Light you have at Home
Taking quality photographs at home does not have to be expensive, and it definitely does not have to be overly technical. The first step in achieving this is to ensure you have the required items on hand. Here are some tips to guide you through the process of producing quality photographs of your products using just the light you have at home.
Items you will need:
1. White or seamless paper for the backdrop or to line your light box.
2. At least two good lights (desk lamps are ok).
Ninety-watt clear daylight bulbs would be ideal. Ensure they are the same wattage and from the same light source. This means you should only use a set of incandescent bulbs, flourescent bulbs or tungsten. Do not mix them. The different bulbs give off a different hue.
* Incandescent bulbs give a yellow hue.
* Flourescent bulbs give a green or orange hue.
* Tungsten bulbs give an orange hue.
Even lighting is important, as it will minimize the shadow on the background as well as help produce a crisp, clear outline of the product. This is especially important for objects that will be cut out, as it makes it easier to do so. Lamps that can bend are great for this type of photography.
3. Tape to hold paper in place.
4. Diffusers and reflectors.
This could be a piece of white muslin fabric that is long enough to cover the box you made. This will help you to achieve a softer effect.
5. Light box.
Light boxes are great for taking photos of products that do not require a model. You can easily make your own light box using a cardboard box or quarter-inch thick, white foam board. Build the box to your desired height based on the size of the product. You can even reuse product boxes such as your iron or toaster box.
Alternately, you can use four pieces of white foam board and set up your box against a wall. Use one board as the backing, one as the flooring and the other two as the side pieces.
Or You can use four 6 to 10 square-inch clear mirrors to reflect light onto the product.
6. Digital camera (use a tripod if you have one).
7. Flat surface.
8. The product.
Now that you have all your tools ready, you can set up your work area and start taking shots of the product.
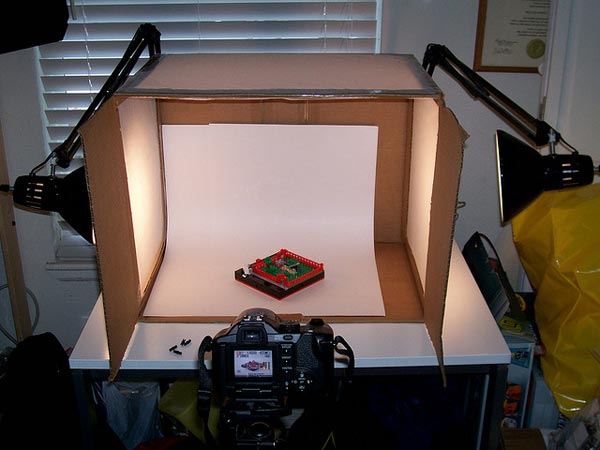
Step 1. Position your light box on the flat surface, place the product inside, and put a light on either side of the box.
Step 2. Set your camera to a low aperture to create a low depth of field. This allows you to capture all the details of the product.
Step 3. Take snaps of the product while adjusting the lighting until you have the desired effect. You may have to use umbrellas or reflectors, and play around with the position of your lights and product, to achieve the look and feel you want your product to have.
N.B: For mirror lighting:
* Place lights over the product and experiment with lighting from various angles. Use 60-watt bulbs. The same principle of not mixing light sources applies.
* With a non-reflective backdrop in place, set the mirrors at a 180 degree angle in front of the product.
* Take multiple shots and make comparisons.
Advanced Tip:
* Depending on its size and weight, you can hoist the product using a string to help lessen the shadow effect under it.
About Author
photopoly
This post is published by a Photopoly.net editorial team.


