Understanding White Balance in Digital Photography
When photos are taken inside, the colors are seldom true. The artificial electric lighting used in indoor spaces cast a blue or orange glow on everything in the shot, altering their appearance significantly. Blue and yellow filters were once used to correct this problem in pictures, but in the era of digital photography filters are no longer necessary. Instead, camera’s use a white balance setting to alter the image’s exposure, and create a final product that is true and rich in color.
How is White Balance Used?
Use the white areas of your photograph as a reference when you are trying to set the white balance. Images that are too orange are considered “warm” and images that are too blue are considered “cool.” Images that do not have their white balance corrected look unnatural. By adjusting the white balance on your camera until the white areas of your photograph are a true white, you protect the color integrity and realism of your image.
Different White Balance Settings
Automatic white balance settings are available on many digital cameras, but they generally do not work well unless you are taking daylight photographs, they simply cannot compensate well for the artificial lighting in indoor settings. In addition to automatic white balance settings, digital cameras typically have about 7 specialized white balance settings intended to simplify the process of balancing the colors in a photograph: Tungsten, Daylight, Shade, Cloudy, Florescent, Flash and Custom.
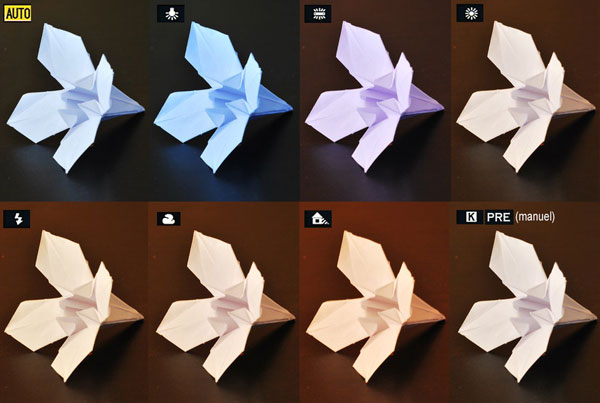
Photo by Sinq88
Using Tungsten Setting
Tungsten white balance is symbolized on the camera’s control panel with a light bulb. It adds cool tones, or blues to a photograph and is appropriate for adjusting lighting that is too orange. It works well for low-lighting, or photographs taken indoors at night with typical incandescent lighting.
Using Daylight Setting
Daylight, symbolized on the camera’s control panel by a sun, is a balanced exposure, and does not truly alter the colors in the image. It is important, however, to remember to change settings when you go inside because the daylight setting is never appropriate for indoor shots.
Using Shade Setting
Shade, symbolized on the camera’s control panel by a little house, is designed to add light and warmth of a photograph. Photographs taken in the shade have a natural tendency to look too cool, and this white balance setting adds the necessary yellow tones.
Using Cloudy Setting
Cloudy setting, symbolized on the camera’s control panel by a cloud, add a very slight amount of warmth to photographs. When taking outdoor photographs if the daylight setting is producing pictures that look too cool, the cloudy setting should be used instead.
Using Florescent Setting
Florescent, symbolized by a long rectangle on the camera’s control panel is designed to correct photographs taken in hospitals, offices or other spaces with commercial fluorescent lighting. The cool effect of fluorescent lighting on a space will make white areas look green if the white balance is not corrected. The fluorescent setting is the strongest of the white balance corrections.
Using Flash Setting
Flash, symbolized by a lightning bolt on the camera’s control panel, adds red and orange tones to the photograph and ensures that the camera uses its flash bulb to add light to the subject when capturing an image. Flash should only be used when there is not enough natural light to capture an image with some other white balance setting.
Using Custom White Balance Settings
Advanced photographers may prefer to set the custom white balance on their camera while taking photographs in a specific setting. To set the custom white balance, symbolized by a dot and two triangles on the camera’s control panel, the photographer must first photograph a white or grey card. An image of the card is taken so that the white or grey fills the whole area. The photographer can then adjust the color of the image until it is as warm or cool as they desire their images to be, based on the appearance of the card image. The exact process for setting a custom white balance is different for each camera, and an advanced photographer wishing to use this setting should refer to their manual for instructions.
