How to Fix Bloodshot and Dull Eyes in Photoshop
Having bloodshot eyes is a condition wherein the cornea or the white part of the eyes becomes red. The most common causes of bloodshot eyes are the following: dehydration, allergy, eye fatigue, and the overuse of contact lenses. It can begin rapidly and can go away easily. It is advisable to eat healthy food to avoid having bloodshot eyes, especially food that is rich in Vitamin A, B and Lutein. You can use eye drops as a remedy for bloodshot eyes and remember to always keep yourself hydrated. But how are you going to get rid of bloodshot eyes when it’s already captured by the camera? How will you stop those bloodshot and dull eyes from ruining your photo?
This article will show you how you can get rid of bloodshot eyes and how you can fix dull eyes in no time.
Fixing Bloodshot and Dull Eyes in Photoshop
It’s amazing what technology can do nowadays, it makes life easier for everyone. Not only can you fix bloodshot eyes and dull eyes, you can also fix and lessen shadow casts caused by lighting. There are many things you can do in Photoshop; this article will focus on fixing bloodshot and dull eyes.
The first step in fixing bloodshot and dull eyes is of course opening the image that needs to be edited. For this tutorial I’m going to use the photo below, so that you can easily see how the process goes and how it changes as we go along.
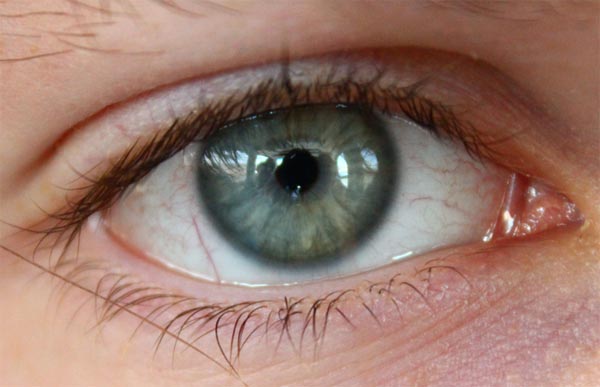
Photo by: hypershadow
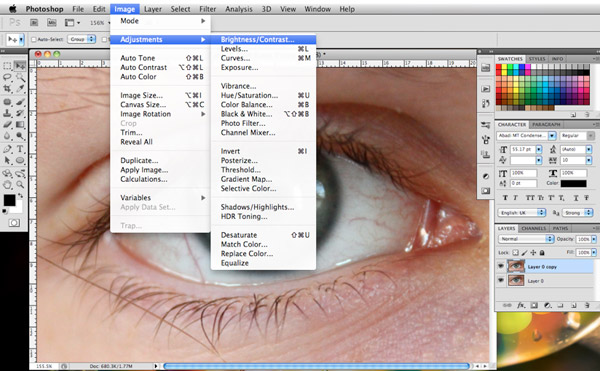
After opening the file, you can duplicate it by pressing COMMAND + J (Mac) or CONTROL + J (PC). It’s always safe to duplicate the original image so you can easily compare the changes you made. If you think the image needs a little more brightening you can adjust the Brightness and Contrast by clicking IMAGE > BRIGHTNESS/CONTRAST.
This will take you to this set of sliders.
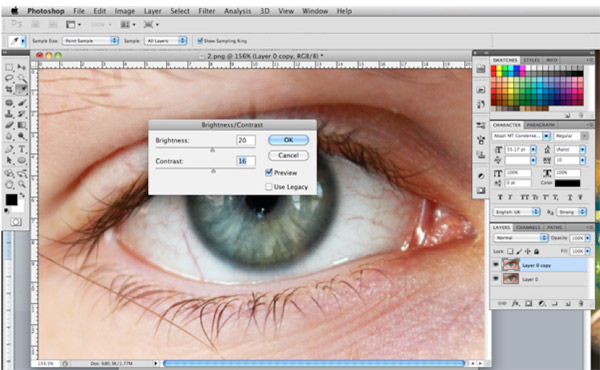
The adjustments you will make will depend on how much brightness and contrast your photo needs. For this photo I have adjusted the Brightness to 20 and the Contrast to 16. You can adjust the slider until you get the right brightness and contrast for your image. Adjusting the brightness and contrast of your image will help you fix bloodshot and dull eyes easier as it gives an overall brightness to your photo by making the cornea a bit brighter than the original shot.
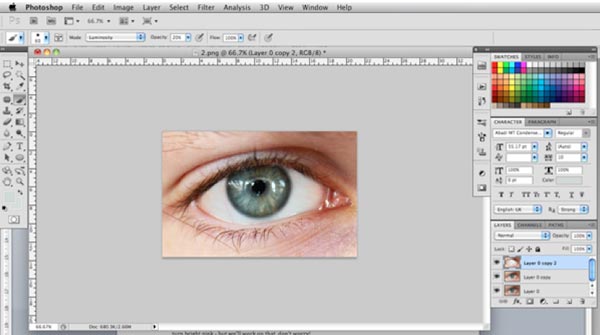
As you may notice, those red veins are stealing the scene, but we won’t let that happen for too long. Again we make a duplicate by hitting COMMAND + J.
To fix this bloodshot eye you have to Click the Brush or hit B on your keyboard and select a soft edge brush that isn’t too big or too small for the cornea of the eye you’re editing; for this image the 30pixel brush worked fine. Change the opacity of your brush to 30% and the mode to Luminosity. Now hold down the ALT button and click on the white area of the eye to select the color you need. After you have selected the bright area of the cornea you can start carefully brushing on the discolored areas. Sometimes you will have to adjust and change the white point to give the photo a more natural look. You can also adjust the opacity of your brush to avoid making the photo look unnatural. If you accidentally brush on the pupils you can always hit the COMMAND + ALT + Z keys to undo it, or you can hit the E key to select the eraser tool and carefully erase the parts that don’t need brushing or brightening.
Here’s what happened to the image after I brushed the cornea.
If the edges of the eyes become unnaturally bright or bright pink you can hit the B key to select the brush and change the brush mode to color. Hold down the ALT key again and select the area of the eye that has a more natural looking color and brush the edges that need to be corrected.
Here are the before and after photos.

No more bloodshot and dull eyes in photos, thanks to Photoshop!

About Author
Anna Altez
Anna works as a Part-time Studio Photographer in the Philippines. She also works as a Freelance Photo/Video Editor and Events Photographer. She loves music and enjoys watching films, and going on adventures. Visit her photo blog here.

Interesting take on bloodshot eyes. However, while reduced, the eyes still appear bloodshot. Also, the white part of the eye is called the sclera, not the cornea. The cornea is the transparent front part of the eye that covers the iris, pupil, and anterior chamber.
Nice and useful tutorial, this is must learning technique to do retouch on images like this way. Great stuff. Thanks